Welcome to My Private Network
We provide VPN services with servers in over 44 countries to protect your security and privacy, and allow you to bypass geographic restrictions.
Read more about how our VPN works here.
This page will guide you through disabling IPv6 on your Apple Mac OS computer. You might want to do this if you’re experiencing network issues with our VPN or MyTelly services even though everything else seems fine.
Note: Having IPv6 enabled on your network will likely cause our services to stop working.
If you’re looking to disable IPv6 on a Windows computer, kindly refer to one of our guides below instead.
Don’t Have a VPN yet? give our Free Trial a go by clicking the button below for 3 full days of unlimited access to both our VPN and MyTelly services.
*3 DAY FREE TRIAL – NO CREDIT CARD REQUIRED
To disable IPv6 on your Mac computer, follow the steps below.
Step 1: Get Started
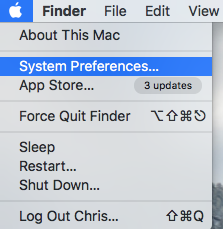
Click on the Apple Menu icon (from the top left of your screen) and select System Preferences.

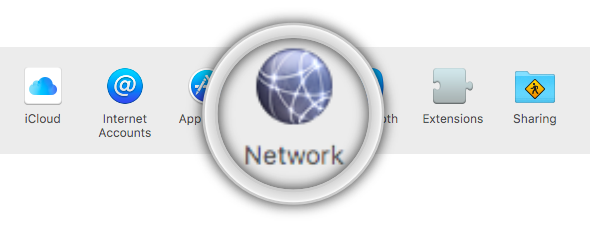
In the System Preferences window, click on Network.

Step 2: Change Network Settings
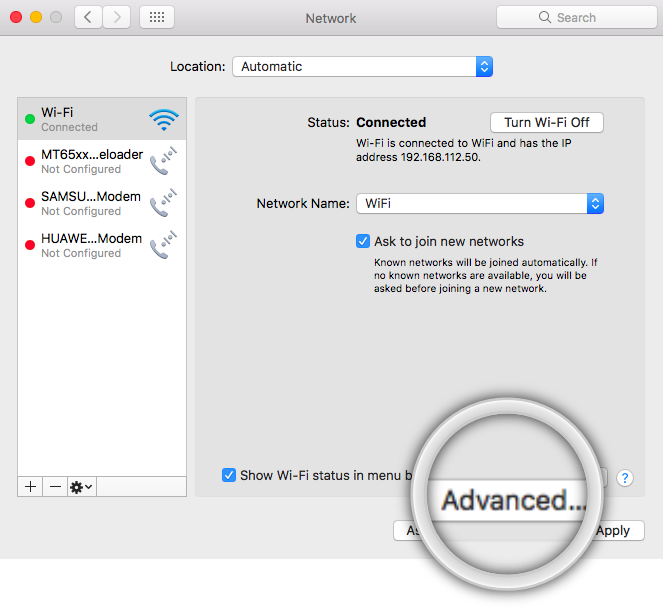
Now, select your active network adapter (Ethernet or Wi-Fi) from the left panel.
Note: If you’re connected to the internet wirelessly, the corresponding adapter should be “Wi-Fi“. However, if you’re connected to the internet via a LAN cable instead, the corresponding adapter should be “Ethernet“.
With your active network adapter selected, click on Advanced.
Step 3: Disabling IPv6
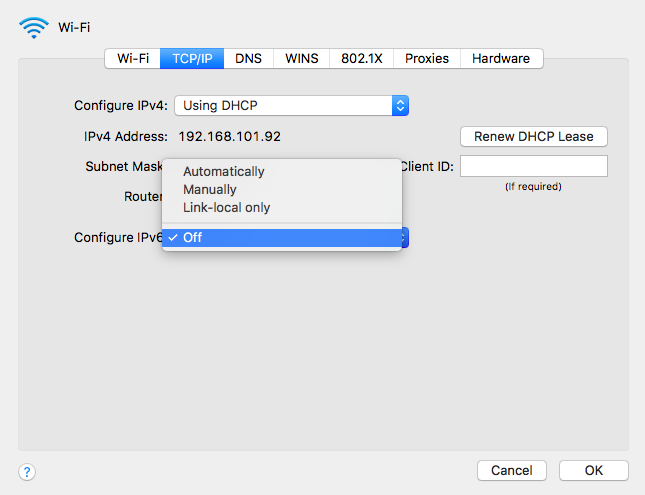
In the Advanced menu, click on the TCP/IP tab.
Click on the Configure IPv6 drop-down menu and set it to Off.
Click on OK to confirm and Apply to save the changes.

Step 4: Restart Computer
Now that IPv6 has been disabled on your computer, kindly restart your computer and the internet router for the changes to take affect.
Once restarted, try connecting to our VPN again.
Note: If you’re using our MyTelly service, kindly ensure that you have re-registered your IP address on our website.
Missing Option To Turn IPv6 Off?
If you don’t have the option to turn off IPv6, you could try to run a command through the Terminal application instead.
To do so, kindly follow the steps below:
- Open Finder.
- Click on Applications.
- Open the Utilities folder.
- Double Click on Terminal.app.
With the Terminal application open, enter the command below according to your connection type (Wi-Fi or Ethernet).
- If you’re connected via Wi-Fi (Wireless Connection)
networksetup -setv6off Wi-Fi
- If you’re connected via an Ethernet (Wired connection)
networksetup -setv6off Ethernet
When entering the command, this is how it should look like on Terminal. (Refer to the image below)

Once you execute this command, you may need to enter your Mac user password to authorise the changes.
Alternative Method: Disable IPv6 on Router
The steps above in this page explains how to directly disable IPv6 on your computer. However, if you’re more tech-savvy, you could also just disable IPv6 on your router which will then affectively disable IPv6 across your entire network.
Note: Unfortunately, due to the huge variety of router brands out there, we couldn’t make a guide for each router available on the market. Having said that, the steps to disable IPv6 should be roughly the same if you know your way around the router’s admin panel.
Any Problems?
Unfortunately not everything goes according to plan.
If you experience any further difficulties, please don’t hesitate to contact our technical support team at [email protected] and we’ll do our best to assist further.


