Check that your version DD-WRT supports OpenVPN
The first thing you need to do is to ensure that you have the VPN version of DD-WRT loaded and working on your router.
You can check this by clicking on the Services tab and then VPN, it should show you options for OpenVPN setup as per the screenshot below.
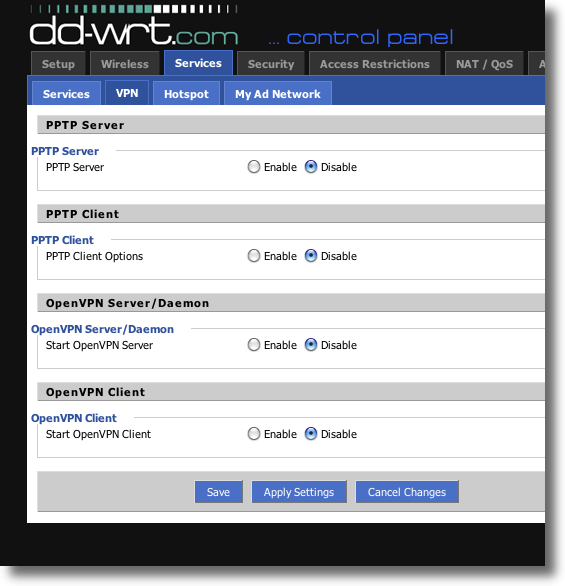
If it does not, you do not have the VPN version loaded. Please either load the VPN version or contact us for further guidance.
Although you can setup OpenVPN using the web interface, this is not compatible with our service, so you need to actually upload the connection script as shown below.
Next, go to Administration > Command and enter the line below into the Command shell.
openvpn --version
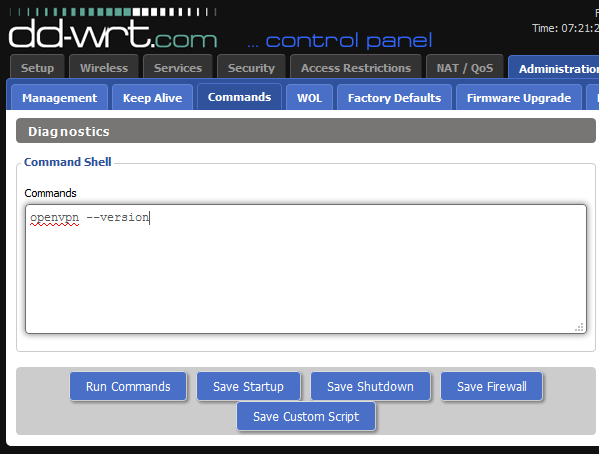
Click on Run Command
The output will list the OpenVPN version that is currently installed on your router.
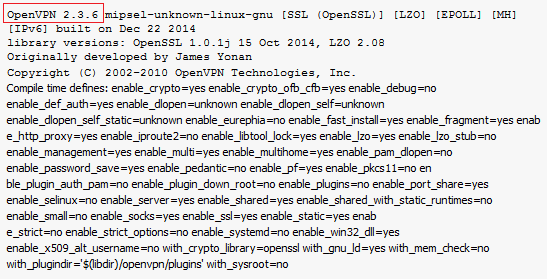
Take note of the version as the connection script to be downloaded later will differ based on the version that you have installed.
Check that the router is working normally
Before you configure the OpenVPN client on your DD-WRT router, make sure it is working correctly and can connect to the internet as per normal.
You will presumably have the WAN or Internet port of the DD-WRT connected to the LAN or Local port of your primary router. You might want to configure the wireless network of the DD-WRT to be something with UK in the name so you can easily tell the difference between both routers, but all of that is up to you.
Download the script
If you are on OpenVPN version 2.3.4 and above, download the DD-WRT script from the following link:
If you are on older version of OpenVPN build on your router i.e OpenVPN 2.1.x , 2.2x etc, download our older connection script that uses UDP port 80 below:
Setup the DNS
Login to the router administration interface and go to Setup > Basic Setup, scroll down and under Network Setup, set the Local DNS to be 4.2.2.1, go down to Network Address Server Settings (DHCP) and change Static DNS 1 to be 4.2.2.1 and Static DNS 2 to be 8.8.8.8 Click Save.
These are public DNS servers located in the US, we suggest using them to avoid any clash with your local ISP settings.
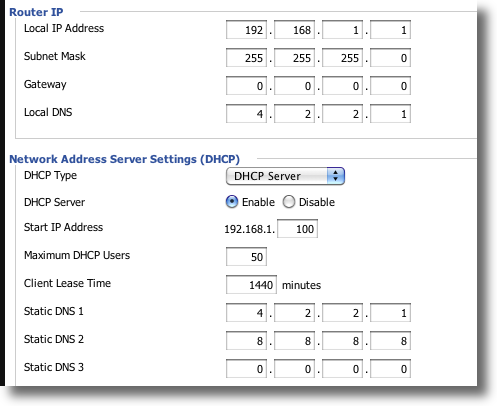
Don’t worry about any other information in this image, it may not be the same for your router or setup.
Enable Syslogd
Go to Services, scroll down to System Log and enable Syslogd, this will provide us with some logging info if there are any problems.
Click Save.

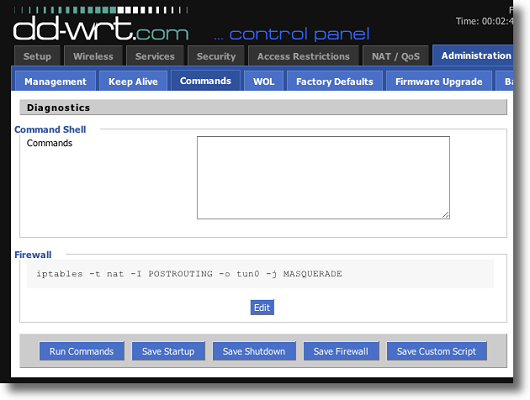
Save the Firewall script
Go to Administration and Commands, enter the following into the the Commands text area:
iptables -t nat -I POSTROUTING -o tun0 -j MASQUERADE
Click on Save Firewall.
Edit and Save the Connection Script
Edit the DD-WRT connection script that you’ve just downloaded and change these details:
USERNAME to be your My Private Network Username
PASSWORD to be your My Private Network Password
COUNTRY to the country ISO code that you are subscribed to i.e GBR if you are subscribed to our GBR(UK) plan.
For the full list of servers that you can connect to, please refer to the countries and server names in our Knowledge Base Article.
For example, if you wanted to connect to our GBR service, the line should be changed from;
remote COUNTRY.mypn.co
to be
remote GBR.mypn.co
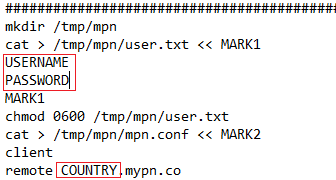
Do not change any other lines in the script.
Copy the entire edited script and paste it into the Command Shell text area and click on Save Startup.
Reboot The Router
The router should apply the changes automatically but if it’s not, go to Administration > Management and click on Reboot Router.

Other Countries
If you want to connect to another country, you will have to change the remote line at the top of the script to ensure you are connecting to the correct server, please see the full list of countries and server names in our Knowledge Base Article.
Problems?
Unfortunately, it does not always go to plan!
If you have any problems or need any further information, please send us an email to [email protected] and we will do our best to assist you.
