Whilst we recommend our MPN VPN Manager app to automate the VPN connection on your Apple iOS devices (iPhone or iPad), there are situations where the connection might fail. In this case, you can use our alternative VPN connection via manual PPTP VPN protocol by following the steps in this guide.
NOTE: PPTP VPN is no longer supported on iOS 10 onwards, however you can still connect to our service by selecting the L2TP protocol instead following the instructions here: Apple iPhone L2TP VPN Setup
Remember, you need an existing internet connection to connect to My Private Network. Make sure your iPhone is connected to the internet and that you are able to browse the web.
Step 1: Getting Started
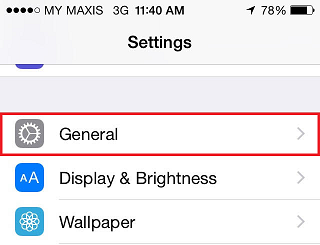
Choose Settings from Main Screen.
Choose General.
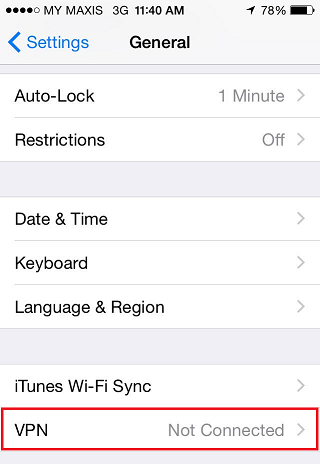
Choose VPN.
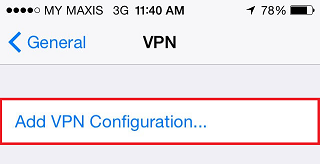
Choose Add VPN Configuration.
Step 2: PPTP Connection Configuration
On the Add Configuration panel, ensure you select PPTP at the top.
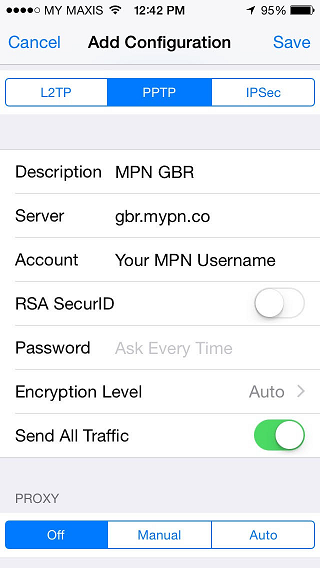
Then enter the following settings:
Description: MPN GBR
Server: gbr.mypn.co
Note: If you want to connect to any of our other servers, ie our USA servers, all you need to do is change the server name. For a detailed list of server names, please refer to our complete list of servers.
Account: Your My Private Network Username
Password: Your My Private Network Password
RSA SecurID: OFF
Encryption Level: Auto
Send all traffic: ON
Proxy should be Off
Double check that you have entered everything correctly and then click on Save.
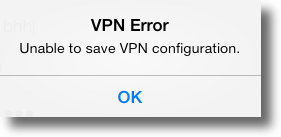
Note: If you get the above error when saving the connection, this is because you already have an existing VPN configuration with the same Description i.e MPN GBR.
To resolve this, please change the Description to something else i.e. MPN GBR 2, MPN UK or alternatively delete the older VPN configuration following the steps outlined on our Knowledge Base here.
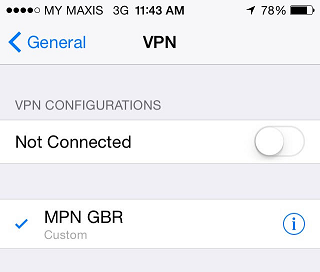
Step 3: Enabling VPN Connection
To connect to our service, turn on the VPN Connection by sliding the VPN ON/OFF button on your device to the ON position. (This slider can also be found at the Settings Menu)
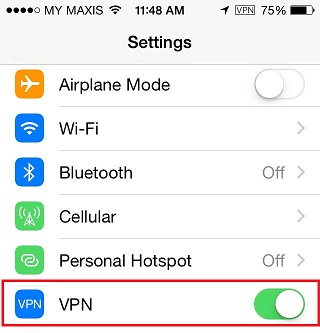
Step 4: You are now Connected
Once you have connected successfully, you will be able to see the VPN logo at top right bar of your iPhone screen.
Other Locations
If you want to connect to any of our other servers, i.e. our USA servers, all you need to do is change the server name. For a detailed list of server names, please refer to our complete list of servers.
Note: You need to have the correct country Plan or our Global Plan to connect to different countries.
Any Problems?
Unfortunately it doesn’t always go to plan!
If you have any problems or can’t get connected, please email us at [email protected]. We’ll get back to you as soon as possible and try to help.
Alternatively, you could give our other VPN protocols a try on your iOS device to circumvent the issues you’re experiencing. Follow the links below to setup the alternative VPN protocols:
