With the recent updates released by Microsoft on mobile devices that’s using the Windows Phone 8.1 Operating System, the option to connect to a VPN network
via the L2TP protocol is added.
Unfortunately, we do not currently have a Windows Phone with us and so have not been able to thoroughly test our service on it but we have confirmation that it works with Nokia Lumia 930 by following the steps listed below.
Checking your version
You would need to ensure that your mobile device is running on at least Windows Phone 8.1 Update 1.
To check your Windows Phone Version, go to Start, and flick left to the App list
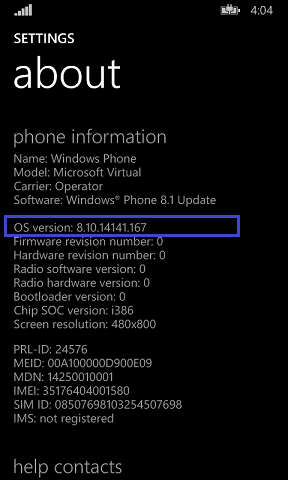
Now, tap on Settings > About > More Info
Note: The software section will indicate the general product release name (i.e. Windows Phone 8.1) while the OS version section indicates the specific
build number of the release (i.e. “7.10.8858.136”).
If your OS version is any of the below, you should be able to see the L2TP option:
OS version: 8.10.14141.167, 8.10.14147.180, 8.10.14157.200, 8.10.14176.243, 8.10.14192.280, 8.10.14203.206, 8.10.14219.341, or 8.10.14226.359
You can also visit the link below for more information on how to check which version of Windows Phone you’re currently using.
http://www.windowsphone.com/en-us/how-to/wp8/basics/which-version-of-windows-phone-do-i-have
Setting up the VPN
Once you’ve confirmed the version of Windows Phone you’re using, please follow the steps below on setting up on our VPN service on your device.
1 – Go to the App List by scrolling down the main screen until you see an arrow as shown below. Once you see the arrow, please tap on it
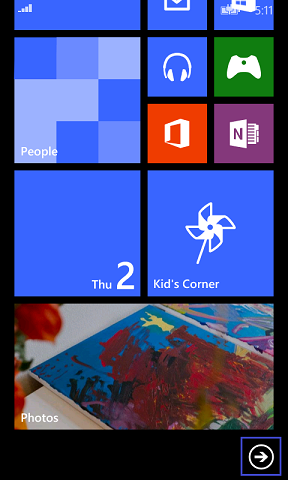
2 – From the App List, scroll down until you see Settings and then select Settings

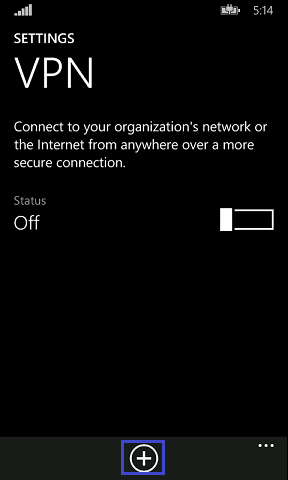
3 – Scroll down until you see VPN and then select VPN

4 – Tap on the ‘+’ sign below to create a VPN profile
5 – You would have to set the servername as GBR.mypn.co
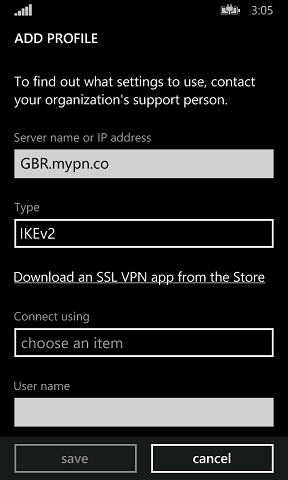
6 – Ensure that the VPN Type is L2TP with IPSec
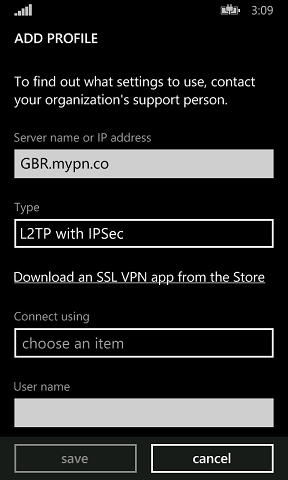
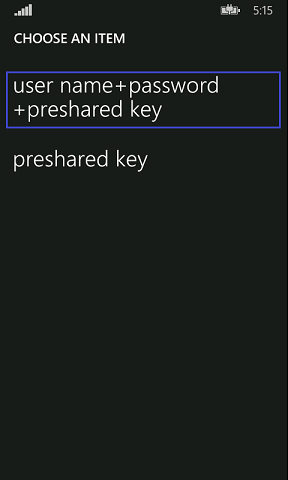
7 – Ensure that that Username + Password + Preshared Key option is selected under Connect Using
8 – Enter your MPN Username and Password in the appropriate field. The Preshared Key is private
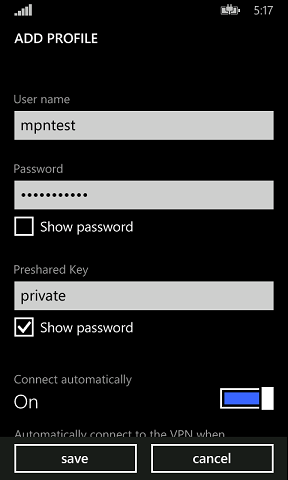
9 – Turn on Send All Traffic. The Profile Name can be anything you want to name this connection, for example: GBR.mypn.co

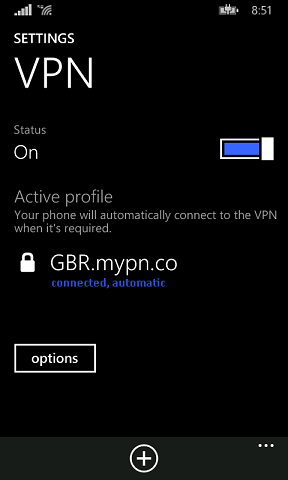
10 – Save the profile. Once you’re connected to our servers, there will be a padlock on the top left corner of the WiFi icon or the LTE/3G icon. Below the VPN profile that you’ve created and saved, it should show connected after that.
If you want to connect to any of our other servers, you will need to change the server name to the appropriate server.
e.g. for our US service, change the server name to USA.mypn.co
Any problems?
Unfortunately it doesn’t always go to plan!
If you have any problems or can’t get connected, please email us at [email protected]. We’ll get back to you as soon as possible and try to help.
