This instructions was created based on our customer’s feedback and it was based on Vu+ Duo2 with OpenVix which has a built in add-on for OpenVPN.
To check on this, use the remote control of your box, press the Menu button and navigate to Setup -> System -> Network -> OpenVPN.
If you have the OpenVPN add-on, you can now proceed with the instructions below:
Step 1: Downloading Configuration Files
To set up OpenVPN, from your computer download the OpenVPN configuration files from the links below:
Or from a Linux Terminal type;
wget www.mypn.co/files/linux/mpnvpn.ovpn
wget www.mypn.co/files/linux/user.txt
Step 2: Editing Configuration Files
Next, edit the mpnvpn.ovpn file via Terminal as per below or on your computer’s Wordpad/Text editor application.
Note: If you’re editing from a Windows computer, you will need to open the file using Wordpad application. This is because the Notepad does not recognise Linux line breaks sequence.
vi mpnvpn.ovpn
Change remote COUNTRY.mypn.co to the country of your choice. i.e. GBR.mypn.co for our United Kingdom service.
remote COUNTRY.mypn.co
to be
remote GBR.mypn.co
Save the file above as mpnvpn.conf
If you wish to connect to another country, please see the full list of available server names and countries you can connect to in our article below:
Which Countries Can I Connect To?
Now, edit the user.txt file as below;
vi user.txt
USERNAME to be your My Private Network Username
PASSWORD to be your My Private Network
Password
Save the changes and exit the editor. Then, save both files to a FAT32 formatted USB stick.
Step 3: Setting up VPN connection
On your Vu+ Duo2 box, plug in the USB stick which you’ve saved the files and SSH into it via Terminal, SSH client, such as PuTTY , Telnet or use a FTP client such as FileZilla.
Note: The default userid is root and there is no password. You will not be able to login into your box via SSH until a password has been set up via Telnet, passwd command.
You will now need to locate and view the OpenVPN script file.
cat /etc/init.d/openvpn
Once you have the script shown on your screen, see where it is looking for the config file in.
CONFIG_DIR=/filepath
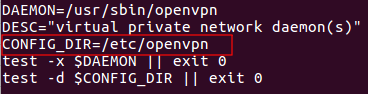
It normally reads /etc/openvpn
Go to this file path, if the openvpn folder is not present, create it there.
mkdir /etc/openvpn
In this folder, copy the two files previously saved on the USB, they should be
- mpnvpn.conf
- user.txt
Step 4: Connecting to VPN
Using the remote control of your box, navigate to the Openvpn add-on by Menu button -> Setup -> System -> Network -> OpenVPN and start the service. If you get a green Running word displayed on your screen, it means you’ve already connected to our service.
Any Problems?
If you are having problems connecting to the VPN but not sure where exactly it’s failing, launch terminal and type in:
tail -f /var/log/messages
This allows you to see if there is a problem somewhere with the configuration or the VPN is just not routing correctly.
Note: The location of the network connection log might be different i.e. in var/log/syslog instead of /var/log/messages
If you continue to have problems or need any further information, please send us an email to [email protected] and we will do our best to assist you.
